今回はアイリスオーヤマのチャイルド&ジュニアシート PZ ISOFIXのレビューです。
![](https://tenkinshufu.com/wp-content/uploads/2023/10/woman-using-pc.png)
アイリスオーヤマにチャイルドシートがあったなんて!
さすがアイリスオーヤマ。安価なのにしっかりしていて購入してよかったです。
クッションを外して背もたれを調整することでジュニアシートにもなるので、長く使えてお得。
初めてISOFIXのチャイルドシートを取り付けましたが、初心者でも簡単に取り付けることができました。
- チャイルド&ジュニアシートの購入を迷っている
- チャイルドシートの取り付け方を知りたい
- ソリオバンディッドに乗っていて小さな子どもがいる
今まで使用していたものは新生児から使用できるものでしたが、娘も2歳になり、しっかり座れるチャイルドシートに買い替えました。
シートの取り付けから装着時の注意点等をまとめましたので、ぜひ最後までご覧ください。
![](https://tenkinshufu.com/wp-content/plugins/pochipp/assets/img/pochipp-logo-t1.png)
アイリスオーヤマ チャイルド&ジュニアシート PZ ISOFIXについて
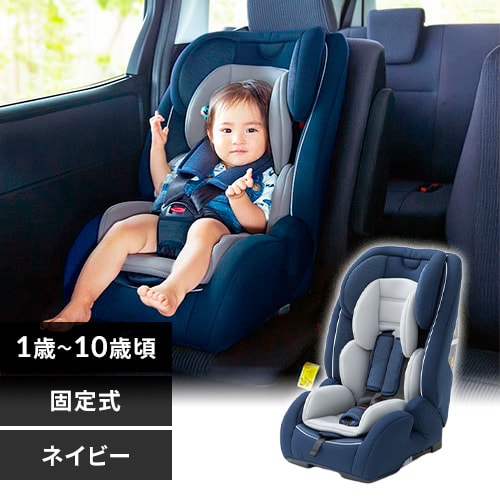
より簡単にしっかり固定できるISOFIX採用で、お子様を守るチャイルド&ジュニアシート。
さらに成長に合わせてヘッドレスト・肩ベルトを調節可能。
1歳~10歳まで(体重9kg~36kgまで)、なが~く使えます。
カバーやインナークッションは取り外して洗濯できるので、清潔を保てます。●商品サイズ(cm)
幅約44×奥行約43×高さ約64
●商品重量
約8kg
●材質
HDPE、ポリプロピレン、ABS
![](https://www.irisplaza.co.jp/IMAGE/HK/PRODUCT/7169216.jpg?iup=202405303)
パッケージ。
楽天で購入しましたが、ずいぶんと大きなダンボール箱で届きました。
![チャイルドシート PZ ISOFIX](https://tenkinshufu.com/wp-content/uploads/2024/05/attaching-a-child-seat-to-soliobandit-1-768x1024.jpg)
本体は約8kgあるので、本体を持ち上げて取り出すのは結構大変。
夫に箱を引き抜いてもらいました。
![チャイルドシート PZ ISOFIX](https://tenkinshufu.com/wp-content/uploads/2024/05/attaching-a-child-seat-to-soliobandit-2-768x1024.jpg)
本体はすでにベルトもついていたためそのまま使えました。
![チャイルドシート PZ ISOFIX](https://tenkinshufu.com/wp-content/uploads/2024/05/attaching-a-child-seat-to-soliobandit-3-768x1024.jpg)
取扱説明書とISOFIXキャップが付属しています。
ISOFIX取付金具が車両シートに隠れて見えにくい場合、延長してチャイルドシートを取り付けやすくするキャップ。
段ボールの香りが結構強くついており、しばらくの間においが取れませんでした。
![チャイルドシート PZ ISOFIX](https://tenkinshufu.com/wp-content/uploads/2024/05/attaching-a-child-seat-to-soliobandit-4-576x1024.jpg)
カバーやインナークッションは取り外して洗濯ができます。
![](https://tenkinshufu.com/wp-content/uploads/2022/10/inspired-woman-1.png)
汚れても安心ですね。
ソリオバンディッドにチャイルド&ジュニアシートを取り付けました
使用するのは2歳の娘です。
今までと同じ運転席側の後部座席に前向きで取り付けることにしました。
まず、ISOFIXの場所を確認。
おそらく赤丸のあたり。
![チャイルドシート PZ ISOFIX](https://tenkinshufu.com/wp-content/uploads/2024/05/attaching-a-child-seat-to-soliobandit-38-1024x576.jpg)
左側。
![チャイルドシート PZ ISOFIX](https://tenkinshufu.com/wp-content/uploads/2024/05/attaching-a-child-seat-to-soliobandit-6-1024x768.jpg)
右側。
![チャイルドシート PZ ISOFIX](https://tenkinshufu.com/wp-content/uploads/2024/05/attaching-a-child-seat-to-soliobandit-7-1024x768.jpg)
![](https://tenkinshufu.com/wp-content/uploads/2022/12/woman-pointing.png)
どちらも結構奥にありました。
チャイルドシート側の後方はこんな感じになっています。
![チャイルドシート PZ ISOFIX](https://tenkinshufu.com/wp-content/uploads/2024/05/attaching-a-child-seat-to-soliobandit-8-1024x1024.jpg)
![](https://tenkinshufu.com/wp-content/uploads/2022/12/woman-answering.png)
それでは、取り付けていきます。
ISOFIXコネクタの取付け方法
1.ISOFIXコネクターボタンを押しながら後方へスライドし、ISOFIXコネクターを引き出す。
![チャイルドシート PZ ISOFIX](https://tenkinshufu.com/wp-content/uploads/2024/05/attaching-a-child-seat-to-soliobandit-39-1024x576.jpg)
ISOFIXコネクターボタンを押すと、ロックが解除され動く状態になるのでボタンが赤くなります。
ボタンを押しながら、
![チャイルドシート PZ ISOFIX](https://tenkinshufu.com/wp-content/uploads/2024/05/attaching-a-child-seat-to-soliobandit-10-1024x768.jpg)
引き出す。
![チャイルドシート PZ ISOFIX](https://tenkinshufu.com/wp-content/uploads/2024/05/attaching-a-child-seat-to-soliobandit-11-1024x768.jpg)
両方引き出した状態。
![チャイルドシート PZ ISOFIX](https://tenkinshufu.com/wp-content/uploads/2024/05/attaching-a-child-seat-to-soliobandit-12-1024x768.jpg)
2.座面に本体を乗せ、ISOFIXコネクターを車両のISOFIX取付け金具に2本同時に「カチッ」と音がするまでまっすぐ差し込む。
ISOFIX取付金具が奥にあるため、なかなかうまく差し込めず時間がかかってしまいました。
私があまり力がないため2本同時差し込むことが難しく、結局片方ずつ固定になってしまいましたが、ISOFIXキャップが無くても取り付けることができました。
![チャイルドシート PZ ISOFIX](https://tenkinshufu.com/wp-content/uploads/2024/05/attaching-a-child-seat-to-soliobandit-14-1024x768.jpg)
3.本体背面が車両背もたれに接するまで、角度を調節し、膝などを使って強く押し込む。
シートの背面の隙間が埋まるように、体重をかけてしっかり押し込みました。
![チャイルドシート PZ ISOFIX](https://tenkinshufu.com/wp-content/uploads/2024/05/attaching-a-child-seat-to-soliobandit-16-1024x1024.jpg)
4.ISOFIXインジケーターの「赤色」が両方とも「緑色」になっていることを確認する。
![チャイルドシート PZ ISOFIX](https://tenkinshufu.com/wp-content/uploads/2024/05/attaching-a-child-seat-to-soliobandit-40-1024x576.jpg)
ISOFIXを取り付けて終わりではありません。
テザーベルトの取付け方法(後部座席後方)
![](https://tenkinshufu.com/wp-content/uploads/2022/10/woman-with-no-hands.png)
後ろ側も固定するとは知りませんでした…
チャイルドシート本体の裏側上部から出ているベルト。ISOFIX対応のチャイルドシートに装備されている補助固定装置の一つ。
これがテザーベルト。
![チャイルドシート PZ ISOFIX](https://tenkinshufu.com/wp-content/uploads/2024/05/attaching-a-child-seat-to-soliobandit-13-768x1024.jpg)
1.テザーベルトの長さをテザーベルトアジャスターのボタンを押しながらゆるめる。
![チャイルドシート PZ ISOFIX](https://tenkinshufu.com/wp-content/uploads/2024/05/attaching-a-child-seat-to-soliobandit-41-1024x576.jpg)
ボタンを押しながら、ベルトを引くと緩みます。
![チャイルドシート PZ ISOFIX](https://tenkinshufu.com/wp-content/uploads/2024/05/attaching-a-child-seat-to-soliobandit-18-768x1024.jpg)
2.テザーベルトを車両のヘッドレストの下に通し、トップテザーフックを固定する。
もうすでにヘッドレストに通して作業をしていました。
![チャイルドシート PZ ISOFIX](https://tenkinshufu.com/wp-content/uploads/2024/05/attaching-a-child-seat-to-soliobandit-17-768x1024.jpg)
トップテザーアンカーにトップテザーフックを固定します。
![チャイルドシート PZ ISOFIX](https://tenkinshufu.com/wp-content/uploads/2024/05/attaching-a-child-seat-to-soliobandit-42-1024x576.jpg)
こんな感じ。
![チャイルドシート PZ ISOFIX](https://tenkinshufu.com/wp-content/uploads/2024/05/attaching-a-child-seat-to-soliobandit-19-768x1024.jpg)
4.テザーベルトのインジケーターが「緑色」になるまでテザーベルトを強く引き、固定する。
調整時のインジケーターは「赤色」。
![チャイルドシート PZ ISOFIX](https://tenkinshufu.com/wp-content/uploads/2024/05/attaching-a-child-seat-to-soliobandit-20-1024x1024.jpg)
グッと強く引ききると、インジケーターが「緑色」になり、しっかり固定されます。
![チャイルドシート PZ ISOFIX](https://tenkinshufu.com/wp-content/uploads/2024/05/attaching-a-child-seat-to-soliobandit-21-768x1024.jpg)
【補足】最後に、ベルトが長いままだと邪魔になるので巻いてまとめます。
![チャイルドシート PZ ISOFIX](https://tenkinshufu.com/wp-content/uploads/2024/05/attaching-a-child-seat-to-soliobandit-22-768x1024.jpg)
まとめた跡がコチラ↓
![チャイルドシート PZ ISOFIX](https://tenkinshufu.com/wp-content/uploads/2024/05/attaching-a-child-seat-to-soliobandit-23-768x1024.jpg)
![](https://tenkinshufu.com/wp-content/plugins/pochipp/assets/img/pochipp-logo-t1.png)
無事取付完了
正面。
今までシートベルト固定のチャイルドシートを使用していましたが、やっぱりISOFIXだと見た目がスッキリします。
頭の当たる部分にヘッドインナーシートというクッションがあり、乗り心地がよさそう。
![チャイルドシート PZ ISOFIX](https://tenkinshufu.com/wp-content/uploads/2024/05/attaching-a-child-seat-to-soliobandit-25-576x1024.jpg)
肩ベルトを固定するバックルは少し大きめ。
![チャイルドシート PZ ISOFIX](https://tenkinshufu.com/wp-content/uploads/2024/05/attaching-a-child-seat-to-soliobandit-27-768x1024.jpg)
赤いボタンを押すと外すことができます。
![チャイルドシート PZ ISOFIX](https://tenkinshufu.com/wp-content/uploads/2024/05/attaching-a-child-seat-to-soliobandit-28-768x1024.jpg)
右側の金具を左側の上に置き、組み合わせます。
![チャイルドシート PZ ISOFIX](https://tenkinshufu.com/wp-content/uploads/2024/05/attaching-a-child-seat-to-soliobandit-30-1024x1024.jpg)
しっかり組み合わせたら、バックルにカチッと音がなるまで差し込みます。
![チャイルドシート PZ ISOFIX](https://tenkinshufu.com/wp-content/uploads/2024/05/attaching-a-child-seat-to-soliobandit-29-768x1024.jpg)
肩ベルトカバー。
![チャイルドシート PZ ISOFIX](https://tenkinshufu.com/wp-content/uploads/2024/05/attaching-a-child-seat-to-soliobandit-31-1024x1024.jpg)
クッションの後ろ。
![チャイルドシート PZ ISOFIX](https://tenkinshufu.com/wp-content/uploads/2024/05/attaching-a-child-seat-to-soliobandit-32-1024x1024.jpg)
インナーシートはフワフワというよりもちもちで、低反発クッションのような感触。
![チャイルドシート PZ ISOFIX](https://tenkinshufu.com/wp-content/uploads/2024/05/attaching-a-child-seat-to-soliobandit-33-1024x768.jpg)
押さえたあとは戻るのに少し余韻が残ります。
![チャイルドシート PZ ISOFIX](https://tenkinshufu.com/wp-content/uploads/2024/05/attaching-a-child-seat-to-soliobandit-34-1024x768.jpg)
手前にハーネスベルトがあり、肩ベルトの長さを調節します。
![チャイルドシート PZ ISOFIX](https://tenkinshufu.com/wp-content/uploads/2024/05/attaching-a-child-seat-to-soliobandit-26-768x1024.jpg)
後部座席の隙間にベビーカーが収納可能
トランクには立てて収納ができませんが、チャイルドシートの前に立てて収納できます。
子どもの足元が邪魔になるほど成長した時にはベビーカーは必要なくなりますし、省スペースになり今のところミニバンは不要です。
![チャイルドシート PZ ISOFIX](https://tenkinshufu.com/wp-content/uploads/2024/05/attaching-a-child-seat-to-soliobandit-35-1024x768.jpg)
![](https://tenkinshufu.com/wp-content/uploads/2022/12/woman-answering.png)
天井が高くて乗り降りや収納がしやすいです。
![](https://tenkinshufu.com/wp-content/plugins/pochipp/assets/img/pochipp-logo-t1.png)
座らせるときの注意点
下の写真のようにバックルのカバーがずれていると金具とバックルが太ももに直接当たり、差し込むときに足のお肉を挟みそうになります。
![チャイルドシート PZ ISOFIX](https://tenkinshufu.com/wp-content/uploads/2024/05/attaching-a-child-seat-to-soliobandit-36-768x1024.jpg)
バックル差し込み時には、バックルカバーで太ももを保護するようにしましょう。
![チャイルドシート PZ ISOFIX](https://tenkinshufu.com/wp-content/uploads/2024/05/attaching-a-child-seat-to-soliobandit-37-768x1024.jpg)
まとめ
いかがでしたか?
初めてのISOFIX対応のチャイルドシートを取り付けてみて、少し時間がかかってしまいましたが慣れればとても簡単に取り付けられそうです。
シートもしっかりしていてクッションが柔らかく、娘も乗り心地がよさそうです。
![](https://tenkinshufu.com/wp-content/uploads/2022/12/woman-answering.png)
もっと早く買えばよかったです!
このレビューが少しでも参考になれば幸いです。
最後までご覧いただき、ありがとうございました。